Here the below article will help you with how to set up and use Multi-currency in QuickBooks. QuickBooks accounting software comprises several functionalities to streamline the finance tasks. Among those options, Multi-currency is one of them to help you monitor foreign transactions and assign a particular currency associated with an international seller.
Nevertheless, you can allot one currency to one client. Allocating the foreign currency there requires making new profiles. Once you enable the QB Multi-currency option, you will not be allowed to disable it.
Enabling QuickBooks Multi-Currency Feature
The QuickBooks Multi-currency option has its advantages. It contains no modification in exchanging rate monthly. There is no requirement to monitor the historical rates and to check the particular bank’s exchange rates. It has decreased the load and complexity of managing the dates and currency during or prior to entering transactions. Moreover, it is not needed to access the spreadsheet to discover the actual invoice and currency applied during the time of entry. Here are the steps.
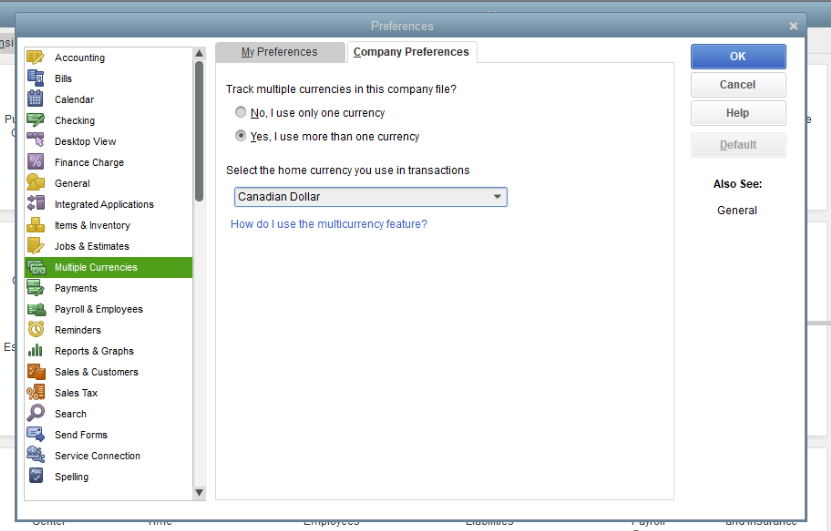
- Initially locate the QuickBooks Edit button.
- Hit on Preferences
- Select Multiple Currencies appearing on the left corner
- Choose the Company Preferences dialogue window.
- You need to place a checkmark on the Yes; I use more than one currency.
- Hit on the Yes option
- Click on the Home currency listed in a drop-down button.
Adding Foreign Customers or Vendors
You can allow only one currency per vendor profile or client. You require creating a new profile to permit a new currency. Existing vendors or customers will be allocated in the home currency once you enabled the respective option. However, the currency is unable to modify for the name already existing in the recorded transactions. Here is the list of below-given steps you need to follow:
- Locate Vendor/customer center to make foreign vendors & customers.
- If the name is available in the list of home currency, then allot a unique name to the foreign Vendor/customer option you make.
- Discover the Vendor/customer option, choose Customer Center/vendor Center
- Hit on the New Customer/Vendor listed in the drop-down button
- Select new customer/Vendor
- Now you have to appoint a Vendor Name/Customer and Currency.
- After this, Hit on OK button
To Add Foreign Accounts
- In this, you can allot one currency per account and then make a new one associated with your foreign transaction.
- Once you enable this option, then the already existing accounts get allocated in the home currency.
- Here the currency can’t be altered for the accounts containing existing recorded invoices and transactions.
- Currencies are allocated to the accounts like Bank accounts, Credit Card Accounts, Customers, Vendors, Customers, Accounts payable(A/P), and Account Receivable(A/R).
Things you need to note down
The currencies of the Accounts (A/P) & (A/R) should match with the Customer’s (Vendor’s currency present in the transactions)
How to Downloading Exchange Rates
The downloading of the rates should be at one condition when your residency contains in USD (US dollar=$).
How to Download Exchange Rates Automatically?
Here are the steps:
- Locate List option
- Select Currency List
- Once done, hit on the Activities option.
- Choose Download New Exchange Rates
How to Enter the Exchange Rates Manually?
- Discover the list menu
- Hit on currency list
- Do a double click on the currency.
- Now you can update the rates of Currency Exchange for a specific date/s appearing in the Edit Currency Window.
Steps to Adding or Removing Foreign Currencies
Following are the steps you need to follow:
Step 1: Steps to Add a Currency
- Locate the gear icon appearing on the top.
- Hit on “Currencies”.
- Find and choose “Add currencies”.
- Select the needed currency displayed on the drop-down option
Step 2: Steps to Remove a Currency
Here are the instructions to remove a multi currency.
- Select the Gear icon displayed on the top of your screen
- Hit on “Currencies”
- Discover “Edit Currency Exchange” listed in the menu.
- Choose Delete menu
- Once done, a prompt window will appear for the verification.
- You have to click on the Yes button.
How to Use QuickBooks Multi-Currency
Here are the steps you need to follow to use the QuickBooks Multi-currency feature:
- Select Customers
- Hit on New Customers
- Choose the Payment & Billing option.
- Once done, now launch the Customer Pays Me with a list.
- Hit on Customer’s currency
- Now save the Customer
- Once applied the saving, now verify the Customer list page, foreign currency, and customer name displayed on the list.
- Locate the home currency customers displaying home currency
- Now open the invoice window, and select a foreign transaction.
- Once done, QuickBooks will automatically display the Customer’s name with two currencies linked with the transaction.
Embed Products or Services to the invoice
At last, customers will get to know how much to pay if there is any balance due to appearing in the foreign currency.
Things to Know Prior to using the QuickBooks Multi-Currency Feature
- Multi-currency feature in QuickBooks is irreversible
- It is recommended to create a backup file prior to turning on this feature if you need to return to a single currency feature.
- Once you enable the multi-currency preferences, then choose the other currencies to monitor
- You can only access the foreign accounts and the name you embedded for a new foreign transaction.
- You are advised to avoid the foreign version associated with the existing client to get payments if you have the client’s invoice with home currency.
- You are not permitted to decide the currency transaction to purchase and sell, so they are allocated according to the currency of vendors and Customers you filled.
- The Customers & Vendors currency contains the amount of purchase and sales transactions and provides the value of home currency identical to the appearing sum of listed transactions.
- The reports will reflect a home currency if you use it in any transactions.
Hopefully, the above information about How to Set Up and Use Multi-Currency in QuickBooks is helpful for you. If you still face any issues regarding the same or need to explore more, you can QuickBooks Desktop Consultant. The hub of a professional team is there for you to solve all your concerns. Moreover, you can use a live chat option or drop an email with questions. Seek assistance from the export team to save your valuable time.