Every transaction you pass or report you create within the program will get populated with its respective date. If you are sending out invoices or any report to your client then QuickBooks will automatically include the date and time within the mailer. Thus let’s find out how to change date format in QuickBooks (Desktop and Online). Setting updates and time is of high importance within QuickBooks.
QuickBooks Date Format US and Canada
Every country follows a different time zone and date format. E.g.
- Date format in Canada: MM-DD-YYYY,
- Date format in the US: YYYY-MM-DD.
Thus, if you are living in the US and you get your clients from Canada then your customers may face some serious date issues. At the time of recording your clients may face issues understanding your invoice. Following a certain format is not of all problems, but the problem arises when you deal with a different time zone. This small issue can be easily sorted by simply changing the date format.
How to Change Date Format in QuickBooks (Desktop and Online)
If you are confused about how to change date format in QuickBooks (Desktop and Online), then let us make one thing very clear, “QuickBooks has no option to format date and time”. It picks up settings from your system.
How to change the date format in QuickBooks Desktop for Windows and MAC
The date format you use in Windows or Mac is then picked up by your accounting program. It not only uses the same format but also copies time from your PC. If by chance you are following the wrong calendar or the time is not right, then the same will get floated within QuickBooks. Thus make sure that you are following the correct dates.
- If you have QuickBooks or any active window running then exit for a while.
- On your desktop, click on the Start button.
- You can find that on the extreme left at the bottom of your screen.
- Click on the Control panel from the list of options provided.
- The dialogue box that now appears, navigates to the regional and language preferences.
- You will now find the format option. Click on the tab and choose according to your preferences.
- Under the date format option, choose the style you now want to follow.
- Once you are done setting the format, click on the apply button.
- Any changes done here will affect how your date will appear in QuickBooks.
- To further style your displayed date, choose the advanced settings option.
- You will now be served with two options: Decimal format, and Minutes format.
- Decimal format: If it’s 6 hours & 30 minutes, then it will be interpreted as 6.50 by your desktop.
- Minutes format: Here the same time above will be interpreted as 6:30. If you want to make life easier for yourself then always choose a minute format.
- Once you are happy with your kind of formatting, click save and this will save all your preferences.
- Choose OK to exit the window.
How to change date format in QuickBooks Online
In just a few clicks, you’ll be able to change the date format in your QuickBooks Online account.
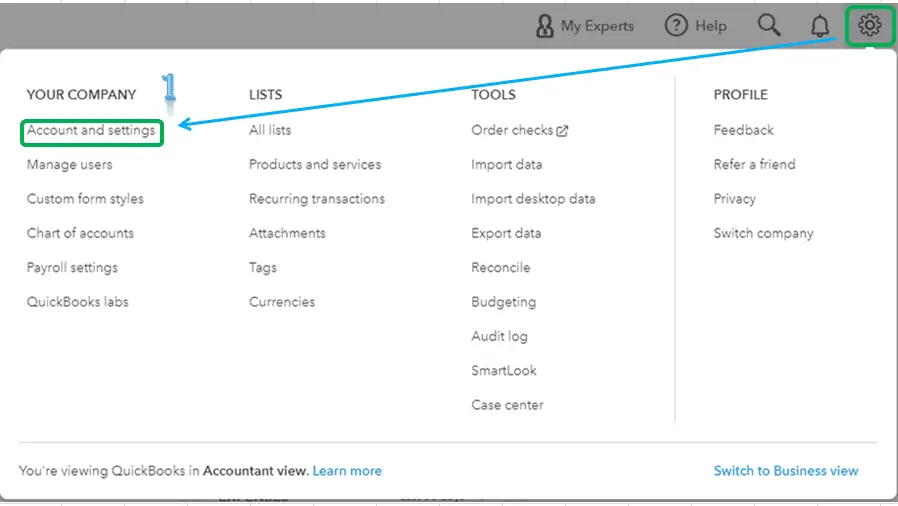
- First, go to the QBO Gear icon and then select Accounts and Settings.

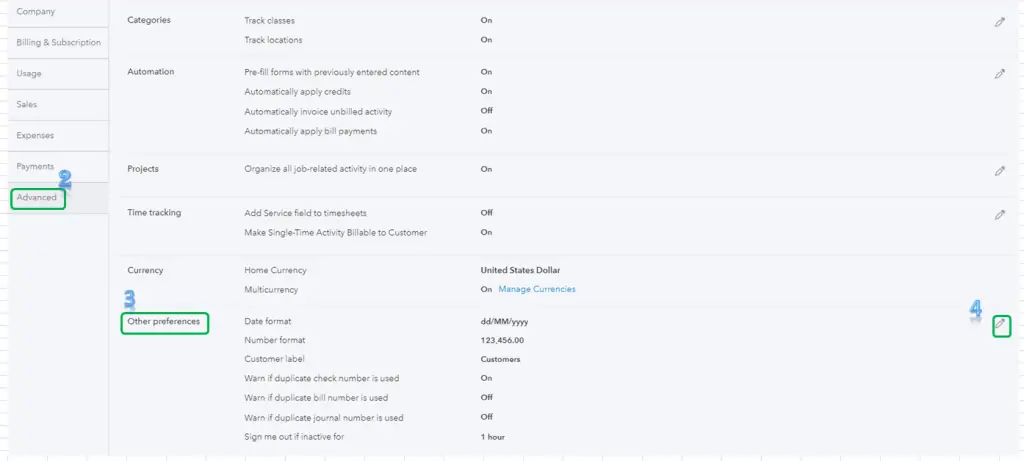
- After that choose the Advanced tab then select Other Preferences.
- Now click the pencil icon beside the Date format.
- In this section, you can select DD/MM/YYYY.

- Finally, select Save and Done.
Though there is no issue in following a certain date format, if you have the option to choose from as per your preferences then go for it, as it will only make your life easier. Hope now you are all sorted. If your query is still not answered and you are looking for “How to change date format in QuickBooks (Desktop and Online) and change reconciliation date in QuickBooks. You can even give us a call at our QuickBooks Consultant to help Canada, the USA, and the UK and talk to our Experts now.
Frequently Asked Questions
-
How do I manually change the date of the bills or invoices in QuickBooks?
It is pretty much simple to change the date of bills or invoices. Here, you can see how:
● In the beginning, sign in to your QuickBooks account
● Next, go to the Gear icon and select the option “Account and Settings”
● After that, select the Advanced tab
● Then click on the pencil icon in the Automation section
● Put a checkmark in the box which is beside the “Pre-fill forms with previously entered content”
● Finally, click Save followed by the Done tab. -
Is it possible to customize the format of the ship date in QuickBooks?
If you refer to these fields then it is possible to change their names by going to the Additional Customization window of the invoice template. Here’s how:
● Initially, go to the Lists from the top menu bar
● Next, select the Templates and then locate the invoice template
● Make a double-click on it to open the window called “Basic Customization”
● From the bottom menu, click on “Additional Customization”
● Enter new names for the fields Ship-To, Ship Via, and Ship Date in the Title columns
● Make sure you check the Screen and Print boxes of these fields
● Finally, click on the OK button.
When you’re done, go back to the Invoice screen and you’ll be able to view the new names in their respective fields.

