
This article has been compiled for all the users who are facing the QuickBooks Point of Sale application has encountered a problem and needs to close an error. This error comes up when the client workstation tries to connect to the server, or when you try to open QuickBooks Desktop Point of Sale on the server. But the user need not worry, this article is a step-by-step guide on how to resolve this QuickBooks Point of Sale application has encountered a problem.
Causes of QuickBooks Point of Sale Application has Encountered a Problem Issue and Needs to Close
There are several reasons why QuickBooks could return the error QuickBooks Point of Sale application has encountered a problem and needs to close. Here are some of the reasons why this issue might arise for users.
- The workstation on which the user is trying to run the QuickBooks Desktop Point of Sale application does not meet the system requirements to run the application.
- The company file could be damaged in some way.
- The client workstation is unable to detect the server on the network, causing a connection failure.
- The security settings in Windows have been set too high either by default or by the users themselves.
- There was some damage endured by the application itself during the installation and downloading QuickBooks Desktop Point of Sale application.
It needs to be kept in mind by the user that even though these issues might arise from time to time for them, it is not a reason to worry. These issues can be fixed very easily and without much trouble by the users themselves. But if not, the users can also contact the Intuit team for technical support and the resolution of this issue.
The user must realize a few things beforehand
- The first and foremost thing the user should do is reboot both their client workstations and their server workstations
- The user can also adjust their User Account Control settings.
- First, the user must open the ‘Run’ Windows key + R application on their workstation.
- In the ‘Run’ command application, the user must type ‘Control Panel and hit ‘OK‘.
- Click on the option titled ‘User Accounts (Classic View)’ option.
- Now click on the ‘Change user account control settings’ option. If the user is prompted by the UAC, they must select ‘Yes’ to continue.
- There will be a slider in front of the user. If they want to turn off the UAC settings, then they must set the slider to ‘Never Notify’ and then select ‘OK’.
- On the other hand, if the user wishes to turn on the UAC settings, then they must set the slider to ‘Always Notify’ and then select ‘OK’. If the user is prompted by the UAC, they must select ‘Yes’ to continue.
- Finally, restart their workstation.
- There are various requirements that the workstation must meet if the user wishes to run the QuickBooks Desktop Point of Sale application. Here are the requirements that the workstation is required to meet for a smooth run of the application.
How to Fix the QuickBooks Point of Sale Application has Encountered a Problem and Needs to Close Issue
That being said, before the user proceeds with the various methods of resolving the issue.
Solution 1: Renaming the WSActivity File
- First, the user needs to navigate to the folder where WSActivity has been saved. The data path where WSActivity has been saved will be like C:\ProgramData\Intuit\QuickBooks Point of Sale XX\Ini. Here, ‘XX’ denotes the version of the user’s Point of Sale.
- Once the WSActivity file has been located, the user needs to right-click on the file and select ‘Rename’.
- The user needs to rename the WSActivity file to ‘OLDWSActivity’.
- Once all the steps above have been completed, the user needs to close and reopen the Point of Sale on all workstations.
Solution 2: Editing Windows host files
To proceed with this solution, the user first needs to make sure that they have a static IP address on the server workstation. Having a dynamic IP address could cause various connectivity issues. After that has been taken care of, the users can follow a very simple, two-step process to fix this issue. The steps have been explained below.
Step 1: Fetching the workstations’ names and IP addresses
- First, the user needs to either press the Windows key and the R key together, or they can also simply search ‘Run’ in the search bar.
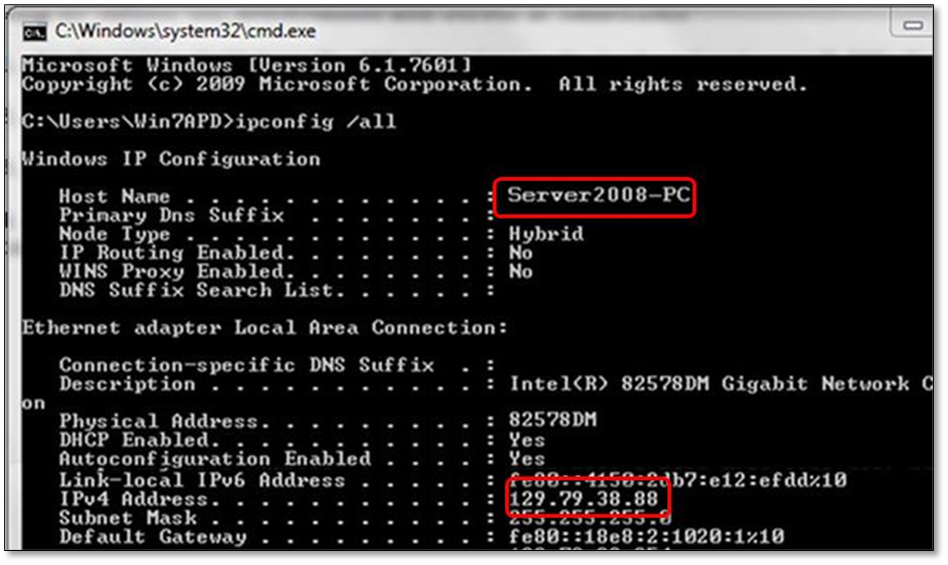
- In the ‘Run’ dialogue, the user needs to type ‘cmd’ and press enter. The word ‘cmd’ stands for the command prompt.
- After the command=prompt has opened, the user needs to then type ipconfig/all and press enter. The hostname and the IP address (or the IPv4 address) will appear in front of the user, along with some other configurations as well. The user needs to make note of the hostname and the IP address.
- Then, the user must repeat the steps mentioned above on all their other workstations and note down all their hostnames and their IP addresses.
Step 2: Editing Windows host files
This step is done after step 1 has successfully been completed. It needs to be done on both the server computer as well as all the other workstations. The procedure is mentioned below.
- First, the user needs to close the QuickBooks Desktop POS application.
- In the server computer, the user needs to open the start menu. This can also be done by hitting the Windows key on the keyboard.
- From the start menu, the user needs to select ‘Computer’. In the ‘Computer’ window, the user can to either of the two data paths written below:
- C:\Windows\System32\Drivers\Etc
- C:\Windows\Syswow64\Drivers\Etc
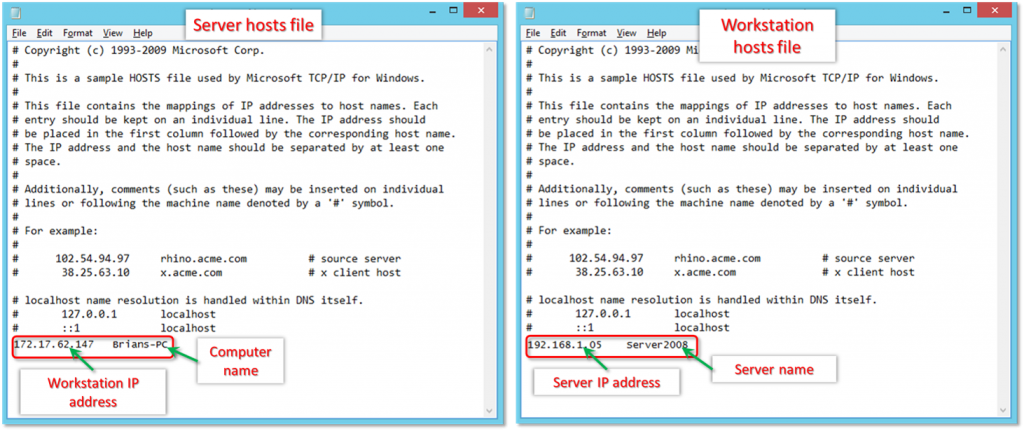
- Once they have navigated to either of the aforementioned directories successfully, the user needs to double-click on the host file, and then select ‘Notepad’ to open the host file.
- Once the host file has opened in the Notepad application, the user will have to enter the IP address, followed by the name of the workstation. It must also be noted that the user should press the Tab key on their keyboard to enter a space. The rule for this is that the server workstation should have the workstation’s IP and computer name, and the workstation should have the server computer’s IP and computer name.
Step 3: Saving the changes made in the host file
Once the changes have been made in the host file by the user, they will now have to save those changes. To save their changes, the user needs to go to the ‘File’ option that can be found in the menu bar on top, and then they need to select ‘Save’ and save it on their desktop. The file should be saved with the name “hosts” with the quotation marks included. After the file has been saved with the latest updates, the user needs to conduct the following steps to bring this process to a successful ending:
- First, the user needs to locate the file they just saved, right-click on it, and select ‘Copy’.
- From the start menu, the user needs to select ‘Computer’. In the ‘Computer’ window, the user can to either of the two data paths written below:
- C:\Windows\System32\Drivers\Etc
- C:\Windows\Syswow64\Drivers\Etc
- Once they have navigated to either of the aforementioned directories successfully, the user needs to locate the host file, right-click on it, and then select ‘Rename’.
- The user needs to rename the host file to host old, and then they can simply press continue.
- Then, the user needs to paste the file they copied from where they saved the updated file. To paste, the user can either press Ctrl+V on their keyboard, or they can right-click in the folder and select paste.
Solution 3: Configuring the firewall settings

The user needs to ensure that their firewall settings are in order with the settings that are recommended if the user wishes to run the QuickBooks Point of Sale. If the settings are not in agreement with the recommended settings, the feature might not work, and the error will prevail. So, it is important to set the firewall with the appropriate settings.
Solution 4: Emptying the contents of the Entitlement Client folder
The user can empty the contents of the entitlement client folder to fix the issue. The only thing to keep in mind is that if the user follows this solution, then they will have to re-register their QuickBooks Desktop Point of Sale once the user has conducted all the steps mentioned below:
- The first step that the user needs to do is that they need to navigate to the following data path on their workstation: C:\Program Data\Intuit\Entitlement Client\v8.
- Then the user must select all the contents in the folder. To select all, the user can press Ctrl+A on their keyboard. Once the contents of the folder have been selected, the user needs to press ‘Delete’.
- The workstation will prompt the user if they are sure they want to delete the files selected. The user must press ‘Yes’ to confirm.
- The final step is that the user needs to re-launch the QuickBooks Desktop Point of Sale application and re-register it.
In case you’re stuck with the process you can contact our QuickBooks point of sale customer Consultant they will guide you with their expertise anytime and anywhere.