In this article, you read and learn about QuickBooks import and export, and how to move data from Quicken to QuickBooks (Desktop or Online). For importing quicken into QuickBooks, you should know that if you are having windows version 1998 or higher then you can directly import your quicken files to QuickBooks Pro or Online. Quicken files on the MAC can only be imported to QuickBooks if it is installed on MAC.
Benefits of Converting Any Accounting Software to the QuickBooks (Desktop or Online)
| QuickBooks Online | QuickBooks Desktop |
| From anywhere in the world you can access your account | It has advanced inventory management |
| On any device, you can manage your finances, including smartphones and tablets | Easy to issue invoices in batches |
| User-friendly interface | You can manage multiple accounts with QuickBooks Desktop |
| In real time you can collaborate with others | With QuickBooks Online you have advanced Inventory management |
System Requirements to Switch your Data Successfully to QuickBooks
| Operating systems | Database servers | Browser requirements | Hardware and operating system requirements |
| Windows 11, 64-bit, natively installed | Windows Server 2022, Standard and Essentials | Internet access and Google Chrome is needed for QuickBooks Desktop 2024. | Processor 2.4 GHz minimum |
| Windows 10, all 64-bit editions, natively installed | Windows Server 2019, Standard and Essentials | _ | RAM (workstation) 8 GB minimum, 16 GB recommended |
| Windows Server 2022, Standard and Essentials | Windows Server 2016, Standard and Essentials | _ | RAM (server) 1-5 Users: 8 GB 10 Users: 12 GB 15 Users: 16 GB 20+ users: 20+ GB |
| Windows Server 2019, Standard and Essentials | _ | _ | Disk Space 2.5 GB of disk space |
| Windows Server 2016, Standard and Essentials | _ | _ | Windows North American version of Windows |
What Data Convert from Current Accounting Software to QuickBooks Desktop
| Account Lists | Customer Lists | Employee lists | Inventory/Item Lists |
| Vendor Lists | Balance Sheet | Trial Balance | A/R Aging detail |
Move Data Quicken to QuickBooks (Desktop or Online)

To grow your business, you can transfer your data from Quicken to QuickBooks Desktop. There are two easy ways to begin the switch either convert to QuickBooks Desktop immediately or upgrade your file first using the Quicken converter.
When to Use Quicken Converter
- When switching from a Quicken version that’s not a parallel version of your QuickBooks Desktop you only need to use the Quicken Converter to move.
- Quicken for MAC: A Quicken for MAC data file cannot be moved using the Quicken Converter or the QuickBooks Conversion Utility.
- Move your data file to Quicken for Windows if you have Quicken for Mac, or start a new QuickBooks company file in its place.
Steps to Move Data from Quicken to QuickBooks Desktop
Before converting your data files from Quicken to QuickBooks Desktop, here are the two instances that you might fall in. Both Quicken and QuickBooks are on the same computer. Quicken and QuickBooks are on different computers. By using Quicken converter and Direct conversion (using conversion utility) in QuickBooks desktop.
Step 1:- Download the Quicken Converter Tool
Download the converter tool version that corresponds to your QuickBooks Desktop’s year version
Step 2:- Move and install data
- Select Next after starting the Quicken Converter.
- Click Next after selecting I accept the terms of the licensing agreement.
- Next, you have to choose Install.
- Select Finish after choosing Launch Quicken Converter.
- Then click Get Started because I’m transferring data from Quicken for Windows.
- Select File after opening a data file on this computer.
- Select OK after choosing your Quicken file (.QDF) from the browse menu.
- After choosing Convert it!, you have to choose OK.
- Select Save, then Exit to save your newly created Quicken Data File (.QDF) file.
You can now begin converting using the Conversion Utility in QuickBooks after upgrading your file to a compatible Quicken version.
Use the Conversion Utility
Using the Conversion Utility in QuickBooks Desktop move your Quicken file.
To do this.
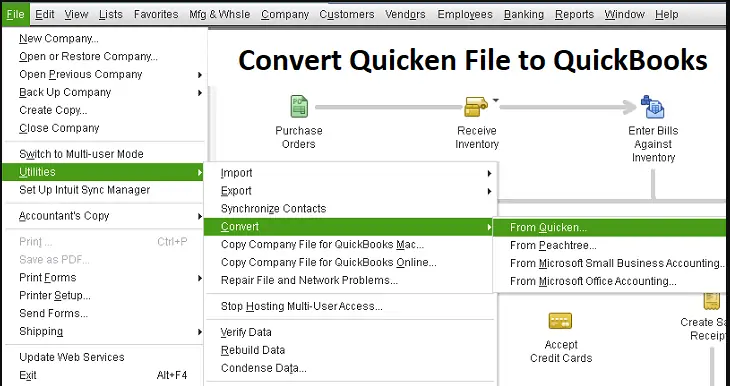
- You have to go to File, then you have to select Utilities then click on Convert.
- Then you have to select From Quicken.
- Now you have to select the Quicken file (.QDF) that you want to move.
- The Conversion Utility will help you to go through the rest of the conversion.
Steps to Import Data Files From Quicken to QuickBooks Online
A third-party program for personal accounting and budgeting is called Quicken. You can import your data file from Quicken to QuickBooks Online if you’re transferring from Quicken so you won’t have to start over.
Step 1:- Export your Quicken data to a file
To import your Quicken data into QuickBooks, export it to a .csv file. You can ask for help from Quicken support if you come across issues while converting your file.
Step 2:- Import the file
- Begin by signing in to QuickBooks.
- After choosing Settings, choose Import Data.
- Then you have to select the type of list that you want to import.
- Choose Browse after that locating the .csv file, choose Open.
- Choose Next, the fields that QuickBooks understands have a green checkmark.
- To map the fields, use the dropdown menus then choose Next.
- You have to review all the entries that you will import.
- Choose Import at last.
Step 3: Connect your bank account
You can link your bank account after importing your data into QuickBooks successfully. Then, use bank rules to classify your transactions so they are placed in the appropriate accounts. If you are looking to import your Quicken file into QuickBooks, there are a few things that you need to know.
- Open up your QuickBooks software
- Hover over your cursor on the Files menu, when the drop-down button appears then you would need to on the utility tab.
- Since you need to import your quicken file to QuickBooks thus first you would need to convert that to a (.QBB) file.
- In the utility tab, you just selected click on the converts tab and choose the source as “Quicken”.
- Convert the file from the list of quicken files.
- Once converted you would now be able to open that in your QuickBooks Online version.
We can export your data or file into QuickBooks and also provide you with a free consultation so that you can make sure that the move is the right decision for your business. If you are still not able to figure out how to import data files from Quicken to QuickBooks (Desktop or Online) pro then get our help. Give us a call at the QuickBooks support telephone number and all the help from our experts.
Frequently Asked Questions
Can I Convert a Quicken file to QuickBooks?
Yes, you can export your Quicken data to a file in .csv format so that you can import it into QuickBooks.
Can Quicken be Upgraded to QuickBooks?
To grow your business you can move your Quicken data to QuickBooks Desktop. There are two ways to start the switch: You can either upgrade your file using the Quicken converter or convert straight to QuickBooks Desktop.

