
When printing checks, QuickBooks users may have an alignment problem. To fix this problem, users can align their checks using the option. Both the QuickBooks (Desktop and Online) versions can use the alignment process. Make sure you use the print checks option to use QuickBooks to check printing alignment. Moreover, alignment correction can be achieved by using Adobe Reader. The check alignment on QuickBooks Desktop can be changed by using the Align button.
You must ensure the print setup option is checked for QuickBooks Online. The majority of alignment issues can be fixed with these choices, and checks can then be written. This article is a compiled guide for users who are trying to learn about how to troubleshoot print alignment for paychecks and preprinted cheques in QuickBooks Online Payroll.
What is the Reason QuickBooks Users Align Check Printing?
A function or tool called QuickBooks align check printing aids in fixing any mistakes that were noted when printing this document. You can correct the alignments with the tool. In addition, the following factors may influence your decision to align your checks.
- When a check is required to be printed professionally, due to poor alignment the results will not be good
- Alignment errors in a check may impact the display
Payroll checks can also be aligned in the software. Post that, printing payroll checks in QuickBooks can be easily done without any alignment failure present.
Let us now learn how to fix print alignment for Paychecks in QuickBooks Online payroll.
How to Troubleshoot Print Alignment for Paychecks and Preprinted Cheques in QuickBooks Online Payroll
Now, let us learn how to repair the alignment when printing checks with QuickBooks compatible checks in QuickBooks Online payroll. In case you use QuickBooks-compatible checks, make sure they are aligned properly when checks are printed or reprinted.
Fix Print Alignment for Paychecks
Repair the alignment
- Navigate to the Settings icon and then choose Payroll Settings
- In the section Printing, choose Edit
- Choose Paycheck on QuickBooks-compatible check paper
- Choose Print paycheck and 1 pay stub or Print paycheck and 2 pay stubs
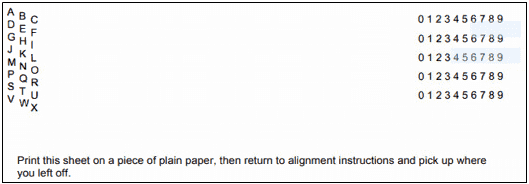
- Choose Align check and then choose Print alignment form to print a sample check
- Implement the instructions and shut the screen
- Implement the instructions and then add the letter along with the number that fits perfectly
- Choose to Save and then click Done.
Now try to print a check and in case you are still required to make adjustments, repeat the steps stated above.
Change the alignment
For instance, the number 5 and the letter K are your present settings in the Printer setup preference. You print a sample check, however the information is too:
- Low: Enter a letter that’s before the letter K (A to J) to move the info up.
- High: Enter a letter that’s after the letter K (L to X) to move the info down.
- Far-right: Enter a number that’s less than 5 (0 to 4) to move the info to the left.
- Far-left: Enter a number that’s more than 5 (6 to 9) to move the info to the right.
May be useful- Setting up QuickBooks Online Check Printing AlignmentFix Print Alignment for Preprinted Checks
You can utilize voucher-style preprinted checks stock with QuickBooks Online Payroll, where the check is in the top third and the stub is in the bottom two-thirds. Make sure your QuickBooks-compatible checks are aligned correctly when you print or reprint paycheques.
The process of troubleshooting print alignment for preprinted checks in QuickBooks Online Payroll is a rather easy and pretty straightforward process that does not require any technical knowledge or fluency.
Here are the steps to fix the alignment in QuickBooks:
1st Step: Set up Printing Preferences
- Navigate to the Settings icon and then choose Payroll Settings
- In the Printing section, choose Edit
- Choose Paycheques on QuickBooks-compatible cheque paper
- Choose Print paycheques and 1 pay stub or Print paycheques and 2 pay stubs
- Choose Align cheque and then choose Print Alignment form to print a sample cheque
- Implement the instructions provided and then shut the screen
- Implement the instructions and then add the letter and number that fits best
- Choose Save and then click Done.
Tips to align the print
Let us assume that the letter k and number 5 are your present settings in the particular Printer setup preference. You print a certain sample cheque along with the information too:
- Low: Enter a letter that’s before the letter K (A to J) to move the info up.
- High: Enter a letter that’s after the letter K (L to X) to move the info down.
- Far-right: Enter a number that’s less than 5 (0 to 4) to move the info to the left.
- Far-left: Enter a number that’s more than 5 (6 to 9) to move the info to the right.
For French business companies: Pronunciations can often cause cheques to show unexpected characters. Use the default alignment L 5.
2nd Step: Print a sample paycheque
- Navigate to Payroll and choose Employees
- In the My Payroll section, choose the Paycheque list
- Choose a paycheque and then choose Print.
May be useful- Reprinting Checks from QuickBooks OnlineWhat are the Different Kinds of Print Formats in QuickBooks?
QuickBooks has support for several print formats, including pre-made templates for various document kinds, bespoke print layouts, and standard formats. These many formats offer flexibility and customization while meeting the various needs of business papers. Printing standard documents like purchase orders, sales receipts, and invoices is quick and simple with standard formats.
With custom print layouts, you may modify a document’s appearance and content to meet certain branding and informational needs. Pre-designed templates are available for a variety of document kinds, including shipping labels and financial reports, which makes it simple to create documents with consistent formatting and a polished appearance.
Custom Print Format
QuickBooks users can customize the print style, preferences, and settings to create unique document presentations by using custom print formats.
Users can produce personalized invoices, purchase orders, and other printouts that match their branding and business requirements by modifying the print style and preference settings. QuickBooks facilitates the incorporation of customized components, including as company slogans, logos, and preferred typefaces, into document presentations, so enabling the smooth integration of corporate identity.
To make sure that the printed materials accurately represent their distinct corporate style and professionalism, users can also choose where these elements are placed and alter the overall visual representation.
Standard Print Format
QuickBooks standard print format offers a pre-configured page layout and printing pattern for creating simple documents and reports. By following accepted printing practices, it guarantees consistency in the look of printed items, like invoices, receipts, and financial reports.
By adding corporate logos and changing font styles, users can alter the standard print format to fit with their branding and visual identity. This feature makes it easier to produce papers that seem professional and makes it easier to communicate effectively with stakeholders and clients.
The standard print format makes printing easier and enables users to quickly produce hard copies of pertinent documents, such as important financial information.
Print Templates
QuickBooks print templates simplify the process of creating professional-looking papers and reports by providing pre-designed formatting and design options.
With the help of these templates, users may quickly and easily guarantee professionalism and uniformity in their documents, saving time on manual formatting and guaranteeing a refined appearance throughout all resources.
Users can customize the templates with many features to suit their needs, be it for sales receipts, invoicing, or other reports. QuickBooks users can show a more polished image to stakeholders and clients by implementing print templates. This will improve the reputation of their business and demonstrate their dependability and attention to detail.
Final Words
We hope that after reading this article till the end, all your queries regarding how to fix print alignment problems for paychecks in QuickBooks Online payroll will be resolved.
May be useful- QuickBooks Online Check PrintingIf you find any kind of difficulty or any query you want to clear, get in touch with the QuickBooks Online support team.
Frequently Asked Questions
What is the primary benefit of laser-printed checks?
QuickBooks Online and Intuit software work together to handle small business accounting. Printing your checks will make it simpler for you to keep track of incoming and outgoing payments. In comparison to using an electronic payment service or outsourcing your check printing, you’ll also save money.
What is the print quality problem in QuickBooks?
Problems with QuickBooks print quality can affect the overall display and readability of printed items by reducing document clarity and creating visual inconsistencies.