
This article has been compiled for all the users who are facing the QuickBooks Point of Sale error 181002. The error message will look like this…
POS Message 181002: The Server Workstation is not running or the company data is not accessible.
The issue could be something as simple as the workstation not being able to connect to the server, or the error could be one out of the following.
- Error: Fixing the Connection
- Error: You are not connected to the server
- Error: Specify the Server and Company Data File
- The point of Sale is greyed out.
May be useful- QuickBooks POS Multi-User SetupCauses QuickBooks Point Of Sale Error 181002
There are several reasons why QuickBooks could return the Point of Sale Error 181002. Here are some of the reasons why this issue might arise for users.
- The server has not been set in multi-user mode.
- Not running Server workstation.
- Maybe the QBPOS database service manager not running
- The connection between the server and the user’s workstation is unable to be established properly because a firewall and/or a third-party application is blocking the connection from happening.
- There might be an issue with the network connection.
- The IP address that is being used by the workstation is a dynamic IP. A static IP should be used instead of a dynamic IP.
- The permissions that are required for network sharing and folders may not have been configured correctly.
May be useful- Set up and Install a Multi-User Network in QuickBooksSteps to Fix the QuickBooks Point of Sale Error 181002
Before the user can begin the process to fix the QuickBooks Point of Sale error 181002, there are a few preliminary checks that need to be completed by the user. The first thing that the user needs to make sure of is whether their workstation meets the system requirements. Once the things mentioned above have been checked by the user and the user has made sure that all their settings are correct, they can proceed to fix the QuickBooks Point of Sale error 181002. There are several ways the user can fix this issue, and these ways have been described in detail below.
Solution 1. Check the Server if the Point of Sale is in multi-user mode
The user can start fixing this issue by checking whether the Server Point of Sale is in multi-user mode or not. If the multi-user mode feature has been enabled, the user will have to select ‘Switch Company File to Single-User Mode.
- Once the user has selected that, they then need to go to ‘File’, followed by selecting ‘Switch Company File to Multi-User Mode.
- Doing this will refresh the multi-user connectivity and the issue should be resolved after doing so.
Solution 2: Editing Windows host files
To proceed with this solution, the user first needs to make sure that they have a static IP address on the server workstation. Having a dynamic IP address could cause various connectivity issues. After that has been taken care of, the users can follow a very simple, two-step process to fix this issue. The steps have been explained below:
Step 1: Fetching the workstations’ names and IP addresses
- First, the user needs to either press the Windows key and the R key together, or they can also simply search ‘Run’ in the search bar.
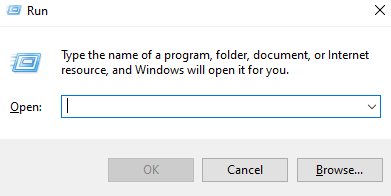
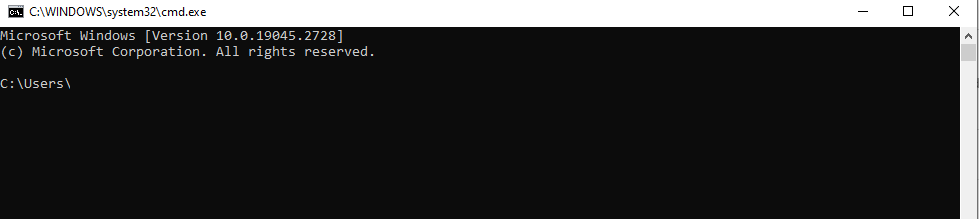
- In the ‘Run’ dialogue, the user needs to type ‘cmd’ and press enter.
- The word ‘cmd’ stands for the command prompt.
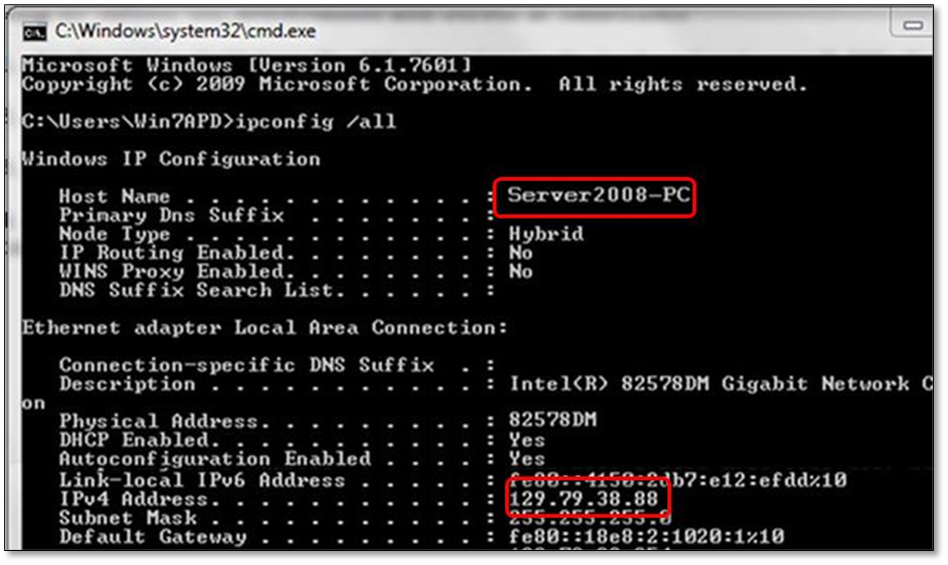
- After the command=prompt has opened, the user needs to then type ipconfig/all and press enter. The hostname and the IP address (or the IPv4 address) will appear in front of the user, along with some other configurations as well. The user needs to make note of the hostname and the IP address.
- Then, the user must repeat the steps mentioned above on all their other workstations and note down all their hostnames and their IP addresses.
Step 2: Editing Windows host files
This step is done after step 1 has successfully been completed. It needs to be done on both the server computer as well as all the other workstations. The procedure is mentioned below.
- First, the user needs to close the QuickBooks Desktop application.
- In the server computer, the user needs to open the start menu. This can also be done by hitting the Windows key on the keyboard.
- Now, From the start menu, the user needs to select ‘Computer’. In the ‘Computer’ window, the user can to either of the two data paths written below:
- C:\Windows\System32\Drivers\Etc
- C:\Windows\Syswow64\Drivers\Etc
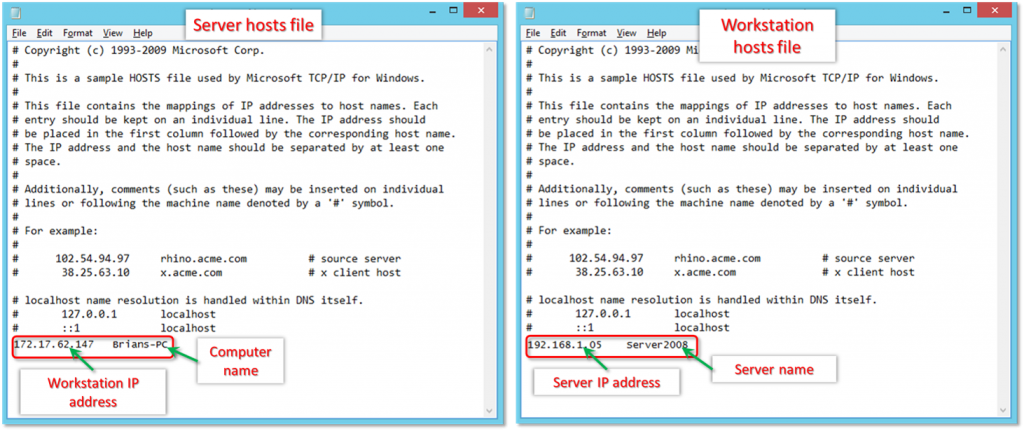
- Once they have navigated to either of the aforementioned directories successfully, the user needs to double-click on the host file, and then select ‘Notepad’ to open the host file.
- Once the host file has opened in the Notepad application, the user will have to enter the IP address, followed by the name of the workstation. It must also be noted that the user should press the Tab key on their keyboard to enter a space.
Step 3: Saving the changes made in the host file
Once the changes have been made in the host file by the user, they will now have to save those changes. To save their changes, the user needs to go to the ‘File’ option that can be found in the menu bar on top, and then they need to select ‘Save’ and save it on their desktop. The file should be saved with the name “hosts” with the quotation marks included. After the file has been saved with the latest updates, the user needs to conduct the following steps to bring this process to a successful ending.
- First, the user needs to locate the file they just saved, right-click on it, and select ‘Copy’.
- From the start menu, the user needs to select ‘Computer’. In the ‘Computer’ window, the user can to either of the two data paths written below:
- C:\Windows\System32\Drivers\Etc
- C:\Windows\Syswow64\Drivers\Etc
- Once they have navigated to either of the aforementioned directories successfully, the user needs to locate the host file, right-click on it, and then select ‘Rename’.
- After the subsequent step, The user needs to rename the host file to host old, and then they can simply press continue.
- Then, the user needs to paste the file they copied from where they saved the updated file. To paste, the user can either press Ctrl+V on their keyboard, or they can right-click in the folder and select paste.
Solution 4: Renaming the WSActivity
- First, the user needs to navigate to the folder where WSActivity has been saved. The data path where WSActivity has been saved will be like this:
- C:\ProgramData\Intuit\QuickBooks Point of Sale XX\Ini. Here, ‘XX’ denotes the version of the user’s Point of Sale.
- Once the WSActivity file has been located, the user needs to right-click on the file and select ‘Rename’.
- The user needs to rename the WSActivity file to ‘OLDWSActivity’.
- Once all the steps above have been completed, the user needs to close and reopen the Point of Sale on all workstations.
Frequently Asked Questions
While editing Window Host’s files, is it possible to press the tab key?
Well, while doing so, The rule for this is that the server workstation should have the workstation’s IP and computer name, and the workstation should have the server computer’s IP and computer name.
Where can one find the QuickBooks Point of Sale Stored Data?
QuickBooks Point of Sale stored Data is located in the following locations:
Point of Sale Installation and Database Server:
C:\Program Files(x86)\Intuit\QuickBooks POS XX
Data File: C:\Users\Public\PublicDocuments\Intuit\QuickBooks POS XX
Is it possible to reset the POS on the computer?
Yes, it is possible to reset the POS on the computer. Unplug the POS device from the power supply and after a few seconds turn the POS back on.