In the below article we will explore the information to invite employees to QuickBooks Workforce to see pay stubs and W2s.
Use the QuickBooks Workforce tool to permit your employees to monitor and print the W-2s and Paystubs. Whenever you run the payroll, all the employees you have set up will receive an email to notify them about their W-2 online and Paystubs.
Invite Employees to QuickBooks Workforce to See Pay Stubs and W-2s
Setting up employees in the QuickBooks Workforce is very simple. You can even invite the employee to modify their details. This option is available only in the QuickBooks Desktop Payroll Basic and Enhanced or QuickBooks Online Payroll. Follow the below steps to invite employees to QuickBooks Workforce to see Pay stubs and W-2s.

- Choose the right products which you want to start.
Step 1: Sign in Workforce in your QuickBooks Desktop
- You require signing into your QuickBooks as an administrator mode
- Ensure that your system contains the advanced QuickBooks release and payroll updates
- Choose Employees option
- Click on Manage Payroll Cloud Services
- If it is invisible then hit on Update QuickBooks
- It will display the Payroll cloud services Window, below QuickBooks
- After this switch the status to ON
- When the prompt window appears then hit on creating a PIN for sending the information related to payroll
- Once done Hit on the Save Changes option
- Choose Return to QuickBooks appears in the confirmation window
- Upload the paycheck details to Intuit at the time the prompt display after you run the payroll
Step 2: Start uploading Paychecks & W-2s
A. Upload the Active Paychecks
Follow the steps:
- Once you run the payroll, choose to Send to Intuit appears on the confirmation Window, and the Next Steps Screen.
- Locate the Window which says Send/Receive Data, choose to Send option.
- It will appear a prompt window asking you to fill the payroll Service PIN.
- In case you are unable to remember to choose to Send to Intuit once you create the paychecks then follow the below steps.
- Discover the Employee option
- Click on Send Payroll Data
B. Upload Past Paychecks
You can easily upload the already created paychecks for employees in QuickBooks Desktop to view. It is best to upload the past paychecks after active payroll tasks. It in turns results in fewer errors. Below are the instructions.
- Locate the File option then click on Print Format
- Choose the print pay stubs option
- Discover the pay stubs window to modify the range of the date in the fields that are checks dated. These fields cover paystubs that you want to send to the workforce of QuickBooks. It is highly suggested to choose only the present calendar year paychecks and to upload in a group of 100-200 paychecks simultaneously to avoid errors.
- Hit on the Send online option.
- Discover Window named Send/receive Data, choose to Send ALL and fill the payroll PIN.
- After this upload of W-2s; make sure that your employee will only view their W-2s from the active tax filling duration.
For QuickBooks Desktop Payroll Basic or Enhanced
At the time you submit the W-2s in January you need to verify the field given to the employee to proceed with secure online access to the W-2 forms on the QuickBooks Workforce site as well as Intuit Turbo Tax.
In case you using QuickBooks Desktop Payroll Assisted then the W-2s forms for the employees get automatically available after the 15th of January in the QuickBooks Workforce
Step 3: Send an Invitation to your Employee
Once you are done with the setup process then start inviting your employees. Follow the pointers:
- Find Employees option
- Choose Manage Payroll Cloud Services
- Thing need to consider: If the manage payroll cloud services are not visible then you require to update the QuickBooks software
- Switch the Status to below the QuickBooks Workforce
- After this choose the invite Employees option
- It will display an employee list
- Choose the employees you need to embed into the Workforce
- Afterward, write your email addresses
- Click on Send Invite
- Once the invitation has been sent then you should view invited details below the status column.
The thing needs to note:
- Sometimes the error occurs that the invite page is unable to load. This issue may be due to the browser settings which interrupt the page to load. With fewer clicks, you can switch on ActiveX filtering
- After this refresh your page then you can access the page
- Employees associated with the Setup will get a link in their email. It will help them to see their paychecks and W-2s online as well in the QuickBooks Workforce.
Setup QuickBooks Online Payroll to View the Pay Stubs & W2s (All Versions)
QuickBooks Online Payroll is perfect for small businesses because it’s easy to set up and use. You can even manage your payroll from anywhere in the world with internet access.
New Employee Setup
- Locate Payroll and then click on Employees
- Click on the Add an employee’s option
- Include the information of employees like an email address.
- It will invite the employees automatically to view the pay stubs & W-2s
- In case you need to add a new employee to embed the personal information, choose the Ask this Employee to fill their tax, banking, and personal information into the Checkbox which says QuickBooks Workspace.
- Hit on the Done button.
Invite Existing Employees
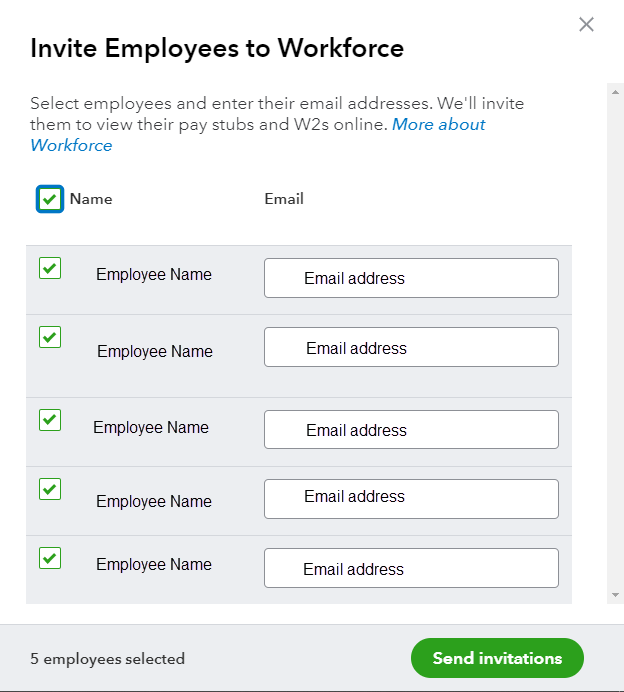
You can easily invite employees in batch or a particular employee to monitor the pay stubs & W-2s. Here are the steps:
- Click on the Payroll option then hit on Employees
- Choose invite to Workforce
- After this verify the boxes appears near the employee’s name you need to invite and fill in their email addresses
- Once finished, choose to Send invitations;
- Afterward, the employee will get a link in an email to set up and then access the QuickBooks Workforce to embed their personal details and monitor both the W-2s and pay stubs.
- When an employee accepts the invitation provided in the email, they can generate their customize Intuit account.
- It permits them to handle User ID, security information, and personal settings.
- If you want to view the status of employee setup you need to choose Payroll then hit on employees.
- The list of employees displays status.
An Employee invitation to TSheets
The QuickBooks Online Elite and Premium let their employees monitor the time with TSheets. You have to invite the employee before proceeding with time tracking.
How to Cancel or Resend an Invitation Employees to QuickBooks Workforce
There are many scenarios that arise when you have to cancel or resend the employee‘s invitation. Here are some reasons.
- When the employee didn’t get the correct invite link.
- If you write the wrong email address.
- The employee has changed an email address.
Intuit Online Payroll
- Discover Employees option.
- Hit on Employee name.
- Locate the section which says Employee Site Access, choose Edit
- Click on Online Paystub access and then fill in an email address of an employee.
- Verify the box appears next to Access their pay stubs online option
- Choose the Send Email button.
On clicking, the employee will get a link provided with an email to set up and monitor the activities like W-2s online and paychecks into QuickBooks Workforce. If you need help and any Consultant, then dial the QuickBooks Consultant number 24/7.
Frequently Asked Questions (FAQ’s)
What do I have to do when the Sent Invitation is not Visible to the Employee?
Follow the below things if your employee is unable to discover their invite:
• Verify your junk folder or Spam folder
• Ensure you use the right email address
• Make sure your employee uses the dissimilar email address for the Workforce as used for the QuickBooks online.
Can I use the QuickBooks workforce after canceling the payroll service?
Yes, you can access QuickBooks for 12 months after canceling the payroll service. After this duration, you are not permitted to access the record. So it is highly recommended to print the documents to save the information.
Can I view pay stubs in QuickBooks Workforce after switching from one QuickBooks to another?
You can view paystubs in your switched QuickBooks Workforce until or unless you receive an invitation or receive permission to view it. If you use QuickBooks Desktop Payroll then you will lose access instantly. You need an invitation from the new payroll service.
Why I am unable to view W-2 after login into QuickBooks Workforce?
The W-2s forms are available after the 15th of January; these are automatically sent to the QuickBooks Workforce after intuit files them. Check the date, because W-2s are not instantly available on Ist January. You require W-2s uploading during the submission in QuickBooks Desktop Payroll Basic, Enhanced, or Standard.

