
Read this article, and get all answers to how to set up QuickBooks Workforce including all related information. QuickBooks introduces this tool to make this easy and clear. It gives you access that your company’s employees have choices to view and print their W-2s and Paystubs. Every time when your employees set up on the QuickBooks workforce, they will receive an email to check their paystubs online.
System Requirements to Set up QuickBooks Workforce
QuickBooks workforce is an amazing tool that permits all employees to share their Paychecks and also take the print of paychecks and W-2. With help of this tool, you can easily view the Paycheck, you get emails that are linked with your PayChecks. These new approaches help your employees to get access to their Paychecks and W-2s via workforce along with Timesheets.
Before Moving Forward, Meet your System Requirements.
- Update the most recent release of QuickBooks.
- Update the Tax Tables.
- Log in as QuickBooks admin.
How to Set up QuickBooks Workforce
QuickBooks Workforce is a feature that allows you to track your employee’s time and attendance. Setting it up is quick and easy, and it can save you a lot of time and hassle in the long run.
Set up your Company File for QuickBooks Workforce Admin
- First of all, install the latest version of QuickBooks update, and also update the recent release of Payroll updates.
- Now, open your QuickBooks Desktop company and choose the “Employees” section
- Hit the next click on the “Manage Payroll Cloud Services”.
- In case, if you are unable to find the Manage Payroll Cloud Services, this is the indication that you don’t have an upgraded version of QuickBooks as well as Payroll.
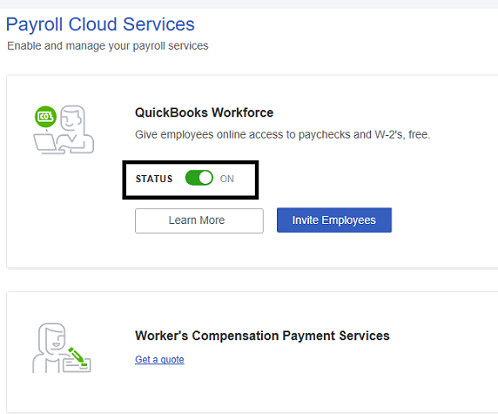
- To find this option, you have to open the QuickBooks Payroll cloud Services window.
- Under the QuickBooks Workforce, switch to the ON button.
- Moving forward with the on-screen below guideline to make or affirm a PIN to send the payroll data.
- After sending it, click on the Save changes.
- Hit the next click on the “Return” option to the QuickBooks in the displayed confirmation window.
- It updates the paycheck information when you run the Payroll for the next time.
Things that need to consider: Ensure that you upload the paystubs, before employees sign in to the QuickBooks workforce. To upload the paycheck details after each payroll, you need to perform the below steps.
- Firstly, open your QB Desktop company file and make paychecks.
- You can be printing your checks but make sure to choose a sending option to Intuit and move forward with the NEXT click.
- Send/Receive data window displayed on your screen, choose the “Send” option, and then enter your Payroll service PIN in the given field.
In any case, if you forget to choose the Send option after making paychecks, you can open the Employees section and then choose the “Send Payroll Data” option. If you setting up your QuickBooks force for the first time, then you need to upload all previous paychecks for your employees to check and verify the paystubs issues.
When a User Needs to Confirm their Account Information with a Code
When the user tries to sign in to QuickBooks workforce by utilizing Intuit Account login. It might be asked you to affirm your Workforce account details by entering your confirmation code.
- In the first step, you have to choose “How you would like to receive your code”
- Click on the “Continue” button and then the code will be sent to your registered on your Email Id
- If you don’t have a long-lasting option to access the email listed, then choose the “Confirm my account a different way” to update the new Email address
- Don’t leave the displayed screen until you enter your confirmation code.
- You have also the choice to open another window if it is required.
- Readdress your confirmation code.
- It might take a little time for the code to come up in your mailbox.
- To locate your confirmation code, check your spam folder also.
- Now, you have to enter your code and click on the “Continue” button.
- In any case, if you didn’t receive the code, choose “Didn’t receive a code”
- If it is found verified then it will automatically be signed in to QuickBooks workforce.
How to Invite your Employee?
Here you can follow the mentioned steps to invite your employee to the QuickBooks workforce.
Step 1: Sign in to your Intuit account in QuickBooks
- Hit first click on the Company menu and then choose the “My Company” option
- Moving forward and choosing the “Sign-in” option
- Now, you have to log in utilizing your Intuit Identity and password
If you find any kind of issue regarding password, hit your click on the “I forgot my user ID or Password”
Step 2: After Following the above Step, you have to Send an Invite
- From the top menu bar, click on the “Employees” menu and then choose “Manage Payroll Cloud Services”
- Open the QuickBooks workforce and switch to the ON button
- From the available preferences, you have to choose “Invite Employees”
- An employee list will pop up on your screen. Then choose those specific employees you want to provide access
- After that, add their email addresses
- At last, choose the “Send Invite” option. Afterward, you would view “Invited” underneath the “Status” column.
You can also invite your employees to see Pay Stubs and W-2s.
You can View Paychecks and W-2s in QuickBooks Workforce
Check out how to view your W-2s, paychecks, and personal information in the Workforce. You may examine your paychecks, W-2s, and other job information, including your home address and bank account information if your company has welcomed you to QuickBooks Workforce and you’ve created an account.
Get your Pay Stubs in QuickBooks
- Activate your Workforce account if you don’t already have one.
- Go to workforce.intuit.com and log in.
- Choose Paychecks.
- Choose the appropriate timeline. Up to a year’s worth of pay, stubs can be viewed at once.
- Choose one of these.
- On the pay stub, you want to download, click Download.
- Choosing a pay stub will allow you to see, download, or print it.
- Choose the Download All option if it is present below the paycheck list to download all of your pay stubs at once (this is not available for everyone).
Obtain your W-2s
The W-2 screen allows you to examine copies B, C, and 2 of your W-2. You might need to first confirm your phone number or any of your personal information for enhanced security.
- Enter the W-2 menu.
- Decide whether you want to view or download the W-2 copy (and then print it).
Have you Deleted your W-2s?
As soon as your company makes it available before January 31, you’ll be able to view your W-2s. W-2 archival records for the previous three years are accessible.
There are several reasons why W-2s might not be accessible:
- Your W-2 has not yet arrived, but we have received it and are processing it.
- Your employer did not submit your W-2 using QuickBooks Payroll.
- Early February should see the arrival of your W-2 by mail.
- Contact your company if you haven’t received it before then and are unable to access it online.
View T4s in QuickBooks Workforce
To record all of the money you paid your employees throughout the previous calendar year to the Canada Revenue Agency, use T4 slips (CRA). You’ll learn how to create and submit your slips from us.
Prepare T4 slips in QuickBooks
Create a T4 slip and distribute it to each employee
- Payroll tax can be found under Taxes (Take me there).
- Select Year-end forms from the Filings menu.
- choose a T4 slip (employer).
- Choose the tax year for which you want to examine T4s.
- To view and examine the slips in Adobe Acrobat, choose View.
- Verify that all of the information is accurate. Using the icons in Adobe Acrobat, download or print the slips, then shut the window.
Using Workforce, distribute T4 forms to your employees
- Your employee is invited to the Workforce
- Select Employees, then Payroll, and finally the person you wish to enroll.
- Then choose Edit, then Pay.
- Check the box next to Recruit this employee to access their pay stubs online and enter the employee’s email address.
- Choose Done.
- An email will be sent to your employee through email.
Send an employee a T4 slip
- Payroll tax can be found under Taxes (Take me there).
- Select Year-end forms from the Filings menu.
- Choose the employee’s T4 slip copy.
- Choose View. The T4 slip’s PDF form will appear in a new tab.
- On the T4 slip for employee page, if the T4 slip is accurate, choose Send to the employee.
So without any hassle, you can set up QuickBooks Workforce for QuickBooks Desktop. It makes it easy to track each employee and things more visible to you to clear out all problematic issues.
Frequently Asked Questions
How do I delete my account QuickBooks Workforce?
You can submit a request for the deletion of your personal information. We won’t be able to recover your data for you once it has been deleted, so please be aware of this
● Access QuickBooks Workforce by logging in.
● Select Account settings from Settings by going there.
● Accounts will be forwarded to you. Click Data privacy in the left menu.
● After clicking Delete, choose to Make a delete request.
How would I be able to Sign-up for the Workforce?
● Open an Intuit account page and then choose the “Create an Account link” option
● Now, you have to enter your phone number and email address
● Then, make a password and you are all set to create an account.
How would I be able to add a Company to the QuickBooks Desktop?
● Open the File from the top menu bar of your QuickBooks
● Hit your click on the “New Company” option and choose the “Express Start” option
● Now, enter all required details such as new company name, contact information, and address in the correct section and then click on the “Create Company”
● To add more companies, you have to repeat the process
Why wasn’t my W-2s available yet?
Your W-2s will not be filed by Intuit or your employer right now. By January 31 at the latest, you need to be able to access your W-2s in QuickBooks Workforce. Inform your employer if the deadline has passed.
How can I Activate my Paycheck in QuickBooks Workforce?
● Firstly, log in to your QuickBooks.
● Choose the employees from the left pane.
● You have an option to add more employees, hitting your click on the “Add an Employee” section.
● Open the personal detail fields.
●Add all details in the given section and then choose the “Invite this employee” option to see their W-2s and paystubs online.
Why aren’t all of my pay stubs from my company available to me?
You might not be able to access all of your pay stubs for a few different reasons. You should ask your employer.
How do I use QuickBooks Desktop to print a T4 summary?
● Choose the Printer icon from the T4 window.
● Input the employee’s T4 page.
● Then Press Print.
● A location to store the file will need to be chosen and you can also give the file a name.