Here through the below post, you will learn that the QuickBooks cannot communicate with the company file due to firewall issues. If you encounter the error message, “Error: Cannot communicate with the company file due to a firewall,” in QuickBooks Desktop, don’t panic. In most cases, it simply indicates a disruption in the connection due to your network firewall. Here’s a step-by-step guide to resolve firewall errors and resume your work.
However, when using QuickBooks sometimes the users face the problems of communication failure. However, several other causes block the company file with QuickBooks let’s explore in detail the causes and their troubleshooting resolutions. The QuickBooks cannot communicate with the company file issue is one of the communication errors. It often arises when users update the software or try to access the company file. It in turn results in unable to connect the company file with the software.
For instance, if the communication issue could be due to a firewall problem then there will appear a message stating that you may require reconfiguring the firewall application. You will also get the suggestion of downloading the doctor file in the error message.
When you have an outdated version of QuickBooks it will pop up the company file connection issues and many other errors such as payroll errors, banking errors, printing errors, and update errors.
The company file folder blocks the company file sharing by setting the wrong folder permissions.
The setting of hosting on the server or other workstation systems is not accurate.
Solutions Steps to Rectify QuickBooks Cannot Communicate with the Company File
Ensure that you update the QuickBooks desktop to the advanced release before starting to troubleshoot the QuickBooks cannot communicate with the company file due to the firewall.
Step 1: Run QuickBooks File Doctor
To use QuickBooks File Doctor, follow these steps:
If the error persists after updating, proceed to the next step.
Step 3: Firewall settings
Make certain that QuickBooks can access your firewall by checking your firewall settings.
If you want more thorough instructions, visit your firewall provider’s website.
Your issue is resolved if you can access QuickBooks and your business file over the network.
Step 4: Set up folder permissions
Ensure that the folder containing your company files is configured to share files over your network.
First of all open the File Explorer window
After this locate to C: \ Program Files \ Common Files.
Now right-click on the common files folder
Hit on the properties button
Below the security option, you have to hit the Edit button
Discover the Users tab below Group or Usernames click on it.
Now locate the permission option below Group
Permit Modify, Write, Read, list folder contents, and Execute buttons
Hit on the Apply button and then click on OK.
Step 5: From the QuickBooks Tools Hub, run the QuickBooks Database Server Manager on your server
To resolve network issues, select Network Issues and then Quickbase Database Server Manager. If QuickBooks is not installed on your server, you’ll be prompted to install it.
Within the QuickBooks Database Server Manager, select Start Scan if your company file folder(s) are displayed. If they aren’t, browse to the location of your company file and then select Start Scan.
The QuickBooks Database Server Manager will automatically repair your firewall permissions.
When the scan is complete, select Close.
Locate and open the folder you scanned once you’re finished. Look for an ND file in the folder, which should look like this: your company fileqbw.nd.
If you do not see the ND file, rescan the folder.
Step 6: Turn off hosting on your workstations
On one of your workstations, open QuickBooks.
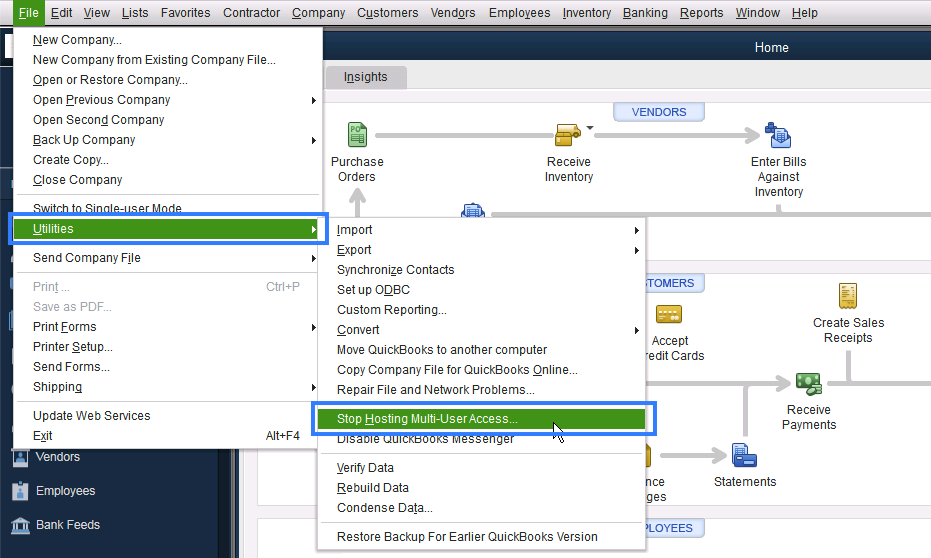
Select the File menu and hover over Utilities, but do not open your company file.
Ensure that the “Host Multi-User Access” option is not selected. If it is not present, move to the next workstation as this one is not causing the issue.
If the “Stop Hosting Multi-User Access” option is available, select it.
Verify that only your server computer is hosting multi-user access, as it should be the only one hosting company files.
On your server computer, open QuickBooks.
In the File menu, hover over Utilities.
Select Host Multi-User Access if it is available. Repeat the process and choose Stop Hosting Multi-User Access. This action resets multi-user mode.
Repeat the process once more, selecting Host Multi-User Access.
That’s all about the troubleshooting guide of QuickBooks cannot communicate with the company file due to the firewall issue. If you still do not sort out the problems then you can reach out to the QuickBooks professional team QuickBooks error consultants chat. Seeks exceptional assistance from the experienced team to save your hours!
Frequently Asked Questions
How to Restart Database Server Manager in your System?
• First of all, find the Control Panel from the Start button • Click on it • Locate the Administrative Tools button • Select services from the listed items • Find QuickBooksDBXX service a right-click on it • Now choose the Restart button • Right-click the QuickBooksDBXX service and then select Restart.
What do I have to do if the Network Data File Extensions are not Showing up in Windows 10?
• Locate Options • Now click on the Change folder • Give a click on the search button • Hit on the View option • Deselect the hidden extension for the desired file types • Once done hit on the ok button
How to Restart the QuickBooks Server Manager when you have installed both QuickBooks Desktop and Server Manager on the server?
• Firstly open the QB desktop on the host system • Now locate the file option and then choose Open Company • On-clicking will display the company file on the screen • Click on the Next option and then place a mark on the open file in multi-user mode • Choose Open and then log in to the company file • Hit on the Logoff option to close the company file • Once done you require to enter the Database in the start option • Click on Run QuickBooks Database server manager.