
Through QuickBooks, you can easily access the company file from the host system or server system. But if QuickBooks hosting mode is off then things will not only become difficult but they will sound tricky as well.
Thus if you don’t want to find yourself in the same situation then here are the requirements you would need to follow:
- You will have to map the server or the host system as the network drive for each workstation.
- Your system is to be set for the multi-user mode.
- Your QuickBooks Company file should be saved in a shared folder.
Turn on QuickBooks Hosting Mode
To configure your QuickBooks server for the multiple user modes, you need to install the QuickBooks Database Server utility tool.
Step 1: Configure QuickBooks Server for the Multiple users
- Log in to the system as the Administrator.
- Check for your internet connection.
- Download the QuickBooks Desktop application in your system and double-click on the setup file to install it in your system.
- Open your QuickBooks Desktop and click on the File menu from the main menu bar.
- Click on the Switch to Multi-user mode.
- Press yes when you receive a confirmation dialog box for hosting the Multi-user hosting setup.
- Press OK when the multi-user setup window pops up on your computer screen.
- Now, you will have to add all the users that will be working on the QuickBooks application. Follow the steps below:
- Click on Company and press the option Set up Users & Passwords.
- Go to the Setup Users option.
- Click the Add user option.
Step 2: How to Turn the Network Discovery On?
If you still see your QuickBooks hosting mode is off then here is what you will have to do next. Though turning on Network discovery mode is an optional thing but it is suggested that you do it for a smoother experience. It should be visible when you want to open any QuickBooks Desktop Company file when you are opening it through the UNC path. Along with this, your Windows operating system will ask you whether you have turned ON your Password Protected Sharing option. If it is turned on then, you can easily log in using the network password or you can even turn off this option.
- Go to your system’s Control panel.
- Click on the Network Sharing Center and go to the Change Advanced sharing setting.
- Expand the profile that you are currently using.
- Go to Network Discovery and click on Turn on Network Discovery.
- Browse for the Password-protected sharing option and then press the option Turn Off password-protected sharing.
- Press the Save Changes option.
This process is to be carried out on all the systems to fix your QuickBooks hosting mode-off issue.
Step 3: Steps to Fix QuickBooks Hosting Mode is Off Issue
- Go to the QuickBooks File menu.
- Click on Open or Restore Company file.
- Browse for the location of the QuickBooks Company file.
- You can see the list of Company files; now select the file that has the file extension .qbw and press Open.
- Now, you will receive a prompt to enter your login credentials.
Hosting Company Data in Multi-user Mode into QuickBooks Desktop
In this section, we’ll explore how to host company data in multi-user mode into QuickBooks Desktop. We’ll start by discussing the benefits of using multi-user mode, including increased efficiency and collaboration.
Benefits of Hosting company data in multi-user mode in QuickBooks Desktop
- Firstly, it allows multiple users to access the same data file simultaneously, enabling collaboration and increasing productivity.
- This can be particularly helpful for businesses with multiple departments or teams that need to work with the same financial data.
- Finally, hosting in multi-user mode can enhance data security and backup, as the hosting provider will typically offer regular data backups and advanced security features to protect against data loss or breaches.
Hosting Defined Allows Computers to Access the File
The situation of allowing other computers to access a company file that is being stored on one computer (the host) is referred to as hosting.
A service is used by QuickBooks to control who has access to company files.
- QuickBooksDB30 is used in QuickBooks 2020.
- QuickBooks uses QuickBooksDB29 as of 2019.
- Using QuickBooksDB28 is QuickBooks 2018.
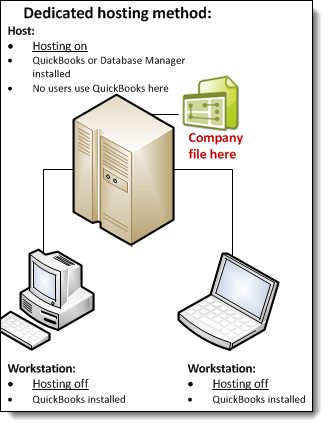
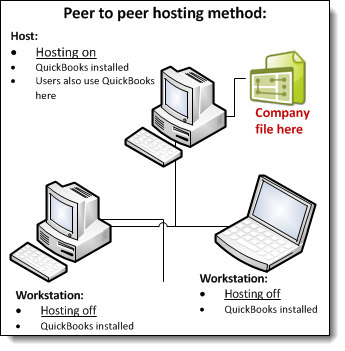
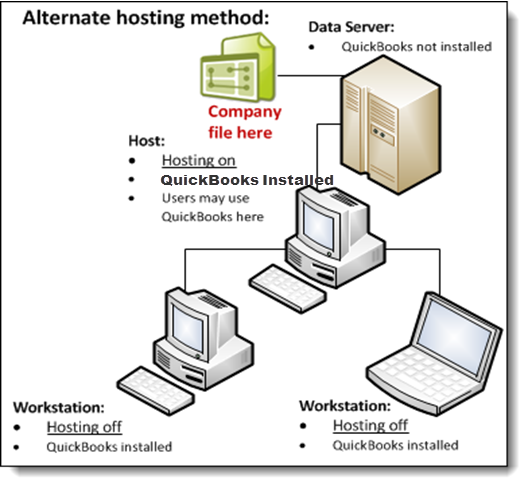
This service is located in User Accounts, under Users for this computer, in the Windows Control Panel. Look for the service that goes with your QuickBooks Desktop version. Below are the diagrams that illustrate QuickBooks Desktop hosting modes.
Method I- Dedicated hosting
Method II- Peer-to-peer hosting
Method III- Alternate hosting
Method IV- How company files are accessed
Before it can allow access to company files 3 conditions are met as QuickBooks Desktop requires.
- Windows File permissions: Users who are signed in must have permissions that are set to Full control, which includes permission to look at, open, and edit the file.
- Database Server mode: Easily and successfully the database server opens the company file.
- QuickBooks User login: QuickBooks user login and password each user should have.
Method V- Hosting Modes
For each version of QuickBooks Desktop and each computer, the hosting mode is set. It is not set for the QuickBooks Desktop installation or the company file. The hosting mode settings for every version are independent when multiple versions of QuickBooks Desktop 2018 or later are used concurrently.
In not Hosting mode
- As a Windows user running QuickBooks Desktop. As a normal process, QuickBooks Database Manager runs.
- Multi-user mode is not supported by hosting mode. The Not Hosting mode communicates with QuickBooks Desktop using shared memory. In this mode, a database server can only be used to access a file by the QuickBooks Desktop user who is running QuickBooks Desktop on the local computer.
In the Hosting Local Files only mode
- In addition to running as the Windows user QuickBooksDataServiceUserXX (where XX is the same 2-digit number from 25 to 28 that the Windows service uses), QuickBooks Database Server Manager also runs as a Windows service named QuickBooksDBXX (where XX is a number from 25 to 28 determined by the version of QuickBooks Desktop, as described above under “Hosting defined”).
- The service QuickBooksDBXX is always active when the computer is turned on.
- TCP/IP is supported for communication with QuickBooks Desktop in multi-user mode. Using a database server operating in Hosting Local Files Only mode, QuickBooks Desktop users on remote computers can access company files.
- When set to Hosting Local Files Only, a computer can only host files that are stored locally.
In Hosting Local and Remote files mode:
- As the Windows user who is currently signed on, QuickBooks Database Manager runs normally. When a user logs into Windows, this procedure begins, and it ends when the user logs out.
- Multi-user mode using TCP/IP to connect to QuickBooks Desktop is supported by computers operating in Hosting Local & Remote files mode. Using a database server, QuickBooks Desktop users can access company files on this computer from remote computers.
- When operating in this mode, a local computer can host both locally stored files and files that have been opened on a local computer.
Method VI- How QuickBooks Desktop choose the database server it should connect
- In QuickBooks Desktop, the .nd file is searched for. A short text file with the same name as the company file but a .nd file extension is known as the .nd file. This file, which has the file extension .qbw, is housed in the same directory as the company file. The IP address and port needed to connect to the server are also included in the directory.
- In case the QuickBooks Desktop decides whether the .qbw file is in use or not.
- QuickBooks Desktop tries to contact the server if it discovers the .nd file and determines that the company file is being used:
- QuickBooks Desktop opens the company file if it is successful.
How to Disable QuickBooks Hosting on Client Computers
- Open QuickBooks
- Go to the File menu and then click on Utilities
- If the Multi-user Access option is already off
- Go to next
- If Hosting Multi-User Access is currently enabled
Click on Stop Hosting Multi-User Access to turn it off.
Resolve the Multi-user Errors
| QuickBooks Error H202 |
| QuickBooks Error H303 |
| QuickBooks Error H505 |
| Quickbooks multi-user mode not working |
| QBDBMgrN not running on this computer |
With the steps above, you can easily turn on QuickBooks hosting mode and fix your error “QuickBooks hosting mode is off”. In case, you need technical help, then you will have to reach out to QuickBooks error support. They provide round-the-clock services across the globe, so you can connect with them anytime throughout the day.
Frequently Asked Questions
How the Files can be accessed after Resolving the problem of QuickBooks Hosting Mode being Off?
● Each user must have the QuickBooks user login and Password
● The user who is accessing the files must have the permission that is set to Full Control.
● This permission gives you access to look at the files, open them, and also modify them.
● Check that the database server can open the company file properly.
What are the different modes of QuickBooks hosting and what to choose after resolving the QuickBooks hosting mode is off?
3 modes are as follows:-
● Not Hosting Mode (Hosting Off Mode)
● Hosting Local Files Only Mode
● Hosting Local and Remote Files Mode
● You can choose the hosting mode according to your access or the things that you want to do.
What if there is an issue with the TCP/IP adapter that shows an error QuickBooks Hosting mode is off.
In Hosting on mode at least one TCP/IP adapter is working so you have run the ipconfig. For that, the steps are as follows:-
● Open the Run window
● Then type CMD in the Run window
● After that, press the Enter button
● The CMD (Command Prompt) window opens up
● In this, type ipconfig and then click on the Enter button.